Using the Engagement Tool
The Enhanced Engagement Tool is designed to amplify impact and foster deeper connection with your customers or clients by giving them the choice to create impacts with you.
Once you have set up your core giving via Recurring Impacts, you can use Engagements as a wonderful way to add additional engagement to your existing giving.
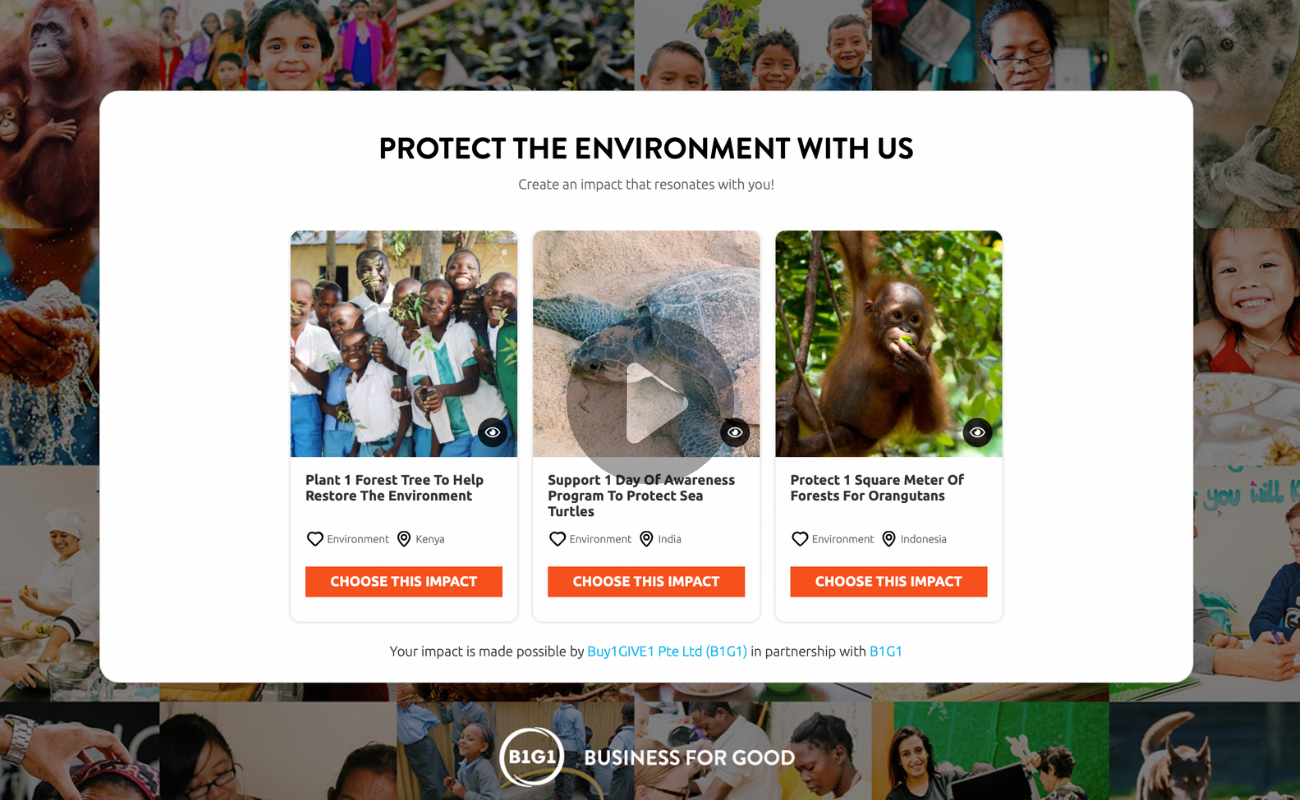
You can choose up to four projects that you would like your audience to be able to choose from. They can then select the impact that personally resonates with them, establishing a connection between their chosen project and the impact they wish to support.
IN THIS ARTICLE
Create an Engagement
To create an Engagement:
- Head to the Create Impacts tab in your top navigation bar. Click on Engagement Tool.

Note: When someone chooses an impact on your Engagement, the impacts are automatically created with the use of Impact Tokens. For this reason, you are required to have Impact Tokens in your account before an Engagement can be created.
- Fill in the details for your Engagement:
- Title
- Sub-title
- Choose up to 4 projects

Tip: Try to ensure the value of the projects you have chosen are the same. You can do this by changing the 'quantity' number on your project card. This is to ensure that the impact chosen is based on which one resonates the most with your audience, and not only on the value of impacts.
If your impacts are of the same dollar amount, it can also enable you to budget more effectively.
- Click SAVE and you're done!
Additional Settings
The Enhanced Engagement Tool also offers a few additional settings that can make this a great lead magnet for your business:
1. Set a redemption limit
Set a maximum number of submissions for this Engagement.
2. Require a redemption code
Set a passcode that will be required before your audience can submit their choice of impact. This helps to ensure that only your intended audience can use this feature.
3. Collect names and email addresses
Turn this on if you want to collect the names and email addresses of those submitting impacts. Click on the three dots in the top right corner of your engagement and find the collected names and emails under 'Export Engagement Data'.
4. Reload after submission
When this is turned on, the engagement page will auto-reload after each submission. This is useful in a retail setting where you may have customers frequently submitting impacts.
Click on Preview under Display Settings to find the following settings:
5. Show the impact counter
When this is turned on, the total number of impacts for each chosen project will be displayed.
6. Show the popularity bar
When this is turned on, the percentage of people who have chosen each project will be displayed.
7. Change the button color
You can change the button color to match your own branding.
Share your Engagement
Once you're ready, the next step is to share your Engagement with your audience!

1. Copy the link to share
Use this option to generate a link that you can directly share with your audience. As an example, this link can be shared in receipt emails or on checkout pages.
2. Download a QR code
Use this option to generate a QR code that you can print or feature online for your customers to easily scan and access the Engagement.
3. Embed it on your website
Use this option when you want to have the Engagement feature on your website as part of a page.
Frequently Asked Questions
How can I prevent multiple submissions of impacts?
The Enhanced Engagement Tool is built with a 24-hour lock period which means that each IP address can only submit one impact per 24 hours.
- HOW MANY ENGAGEMENTS CAN I CREATE?
You’ll notice we’ve given you ten of the ‘Impact Together’ Engagements in your account. If you’d like to have more … you can!
Can I embed an Engagement in an email?
Emails do not allow embedded codes and that means it is not possible to embed an Engagement in an email. A creative workaround for this is to take a screenshot of your Engagement and include that image in your email. You can then link the image to your Engagement.
Can I get a weekly summary of my engagement tool activities?
Yes! Every Monday at 6 a.m. (Singapore time), you will receive an email with a summary of the previous week's activities.
Can I send an automatic 'Thank You' message to the people who have submitted?
We are working on this feature at the moment so when it's ready, we'll update you!
How do I know who has created an impact?
You'll have to enable the 'collect name and email addresses' setting on the Engagement in order to know who has submitted. Once you do this, head to the settings and choose 'export engagement data' to download a file of who has used your Engagement Tool.